
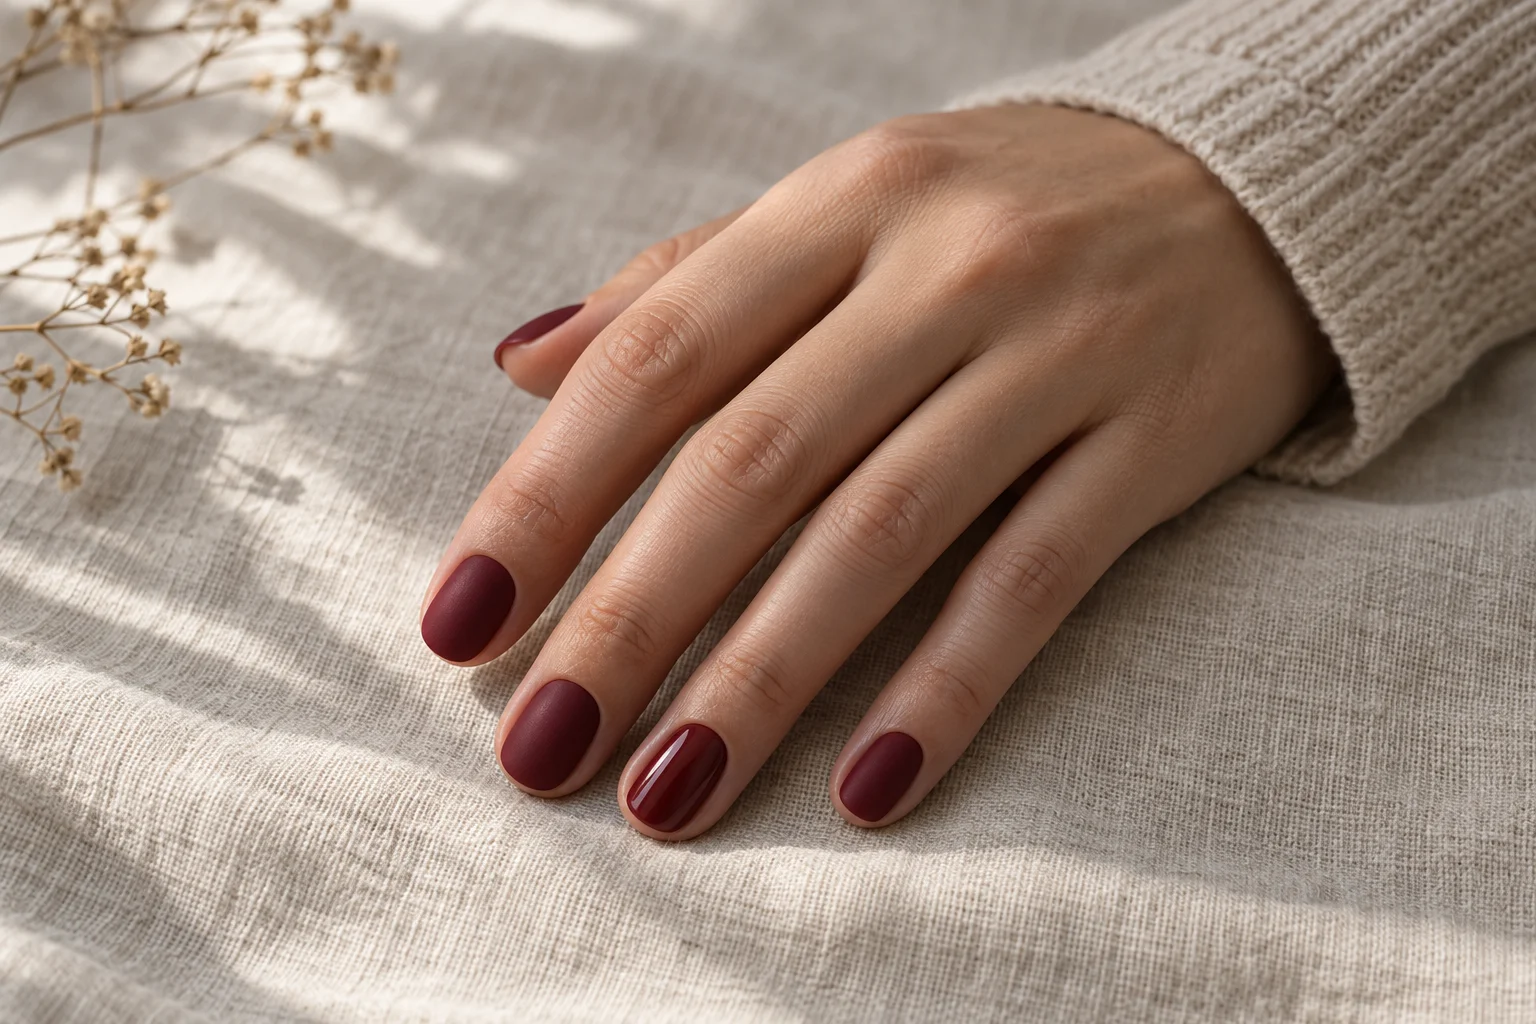
To combine matte and glossy finishes, start with one color and choose where the shine belongs: a whole accent nail, a narrow French tip, or a curved line. Leave the surrounding nails or areas matte so the finish creates the pattern. A glossy accent nail is a straightforward regular-polish starting point because it requires no linework within the nail.
This guide combines creative design suggestions with manufacturer guidance from OPI and Essie—not hands-on testing. The DIY sequence is limited to regular polish; gel requires its own product-specific instructions.
1. Choose where the shine belongs
Think of gloss as a design detail, not a final layer that automatically goes everywhere. OPI describes glossy tips over matte nails, matte tips over glossy nails, and shiny designs over a matte finish. These examples support the design concept, not a promise about how long the contrast will last.
Choose one layout before selecting products. The colors below are creative examples, not tested shade recommendations.
| Layout | Design idea | Planning decision |
|---|---|---|
| Glossy accent nail | Burgundy throughout, with glossy ring fingernails and matte remaining nails | Repeat the accent on both hands or use it on just one? |
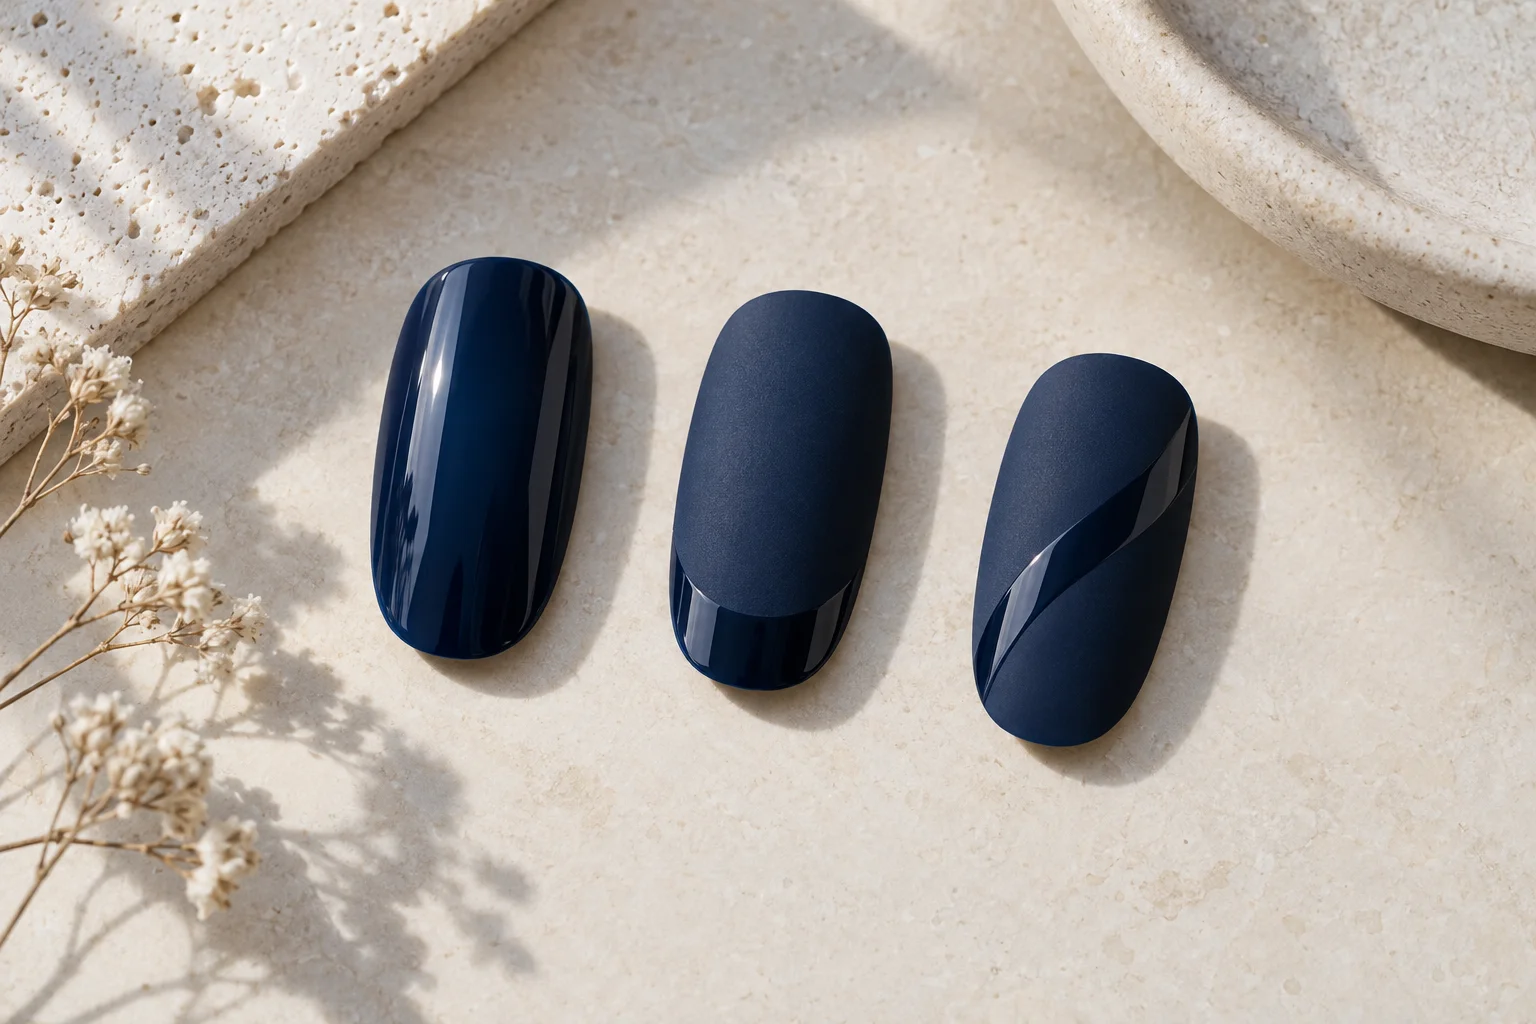
| Glossy French tips | Matte navy with a shiny edge | Keep the tip fine or make it a broader band? |
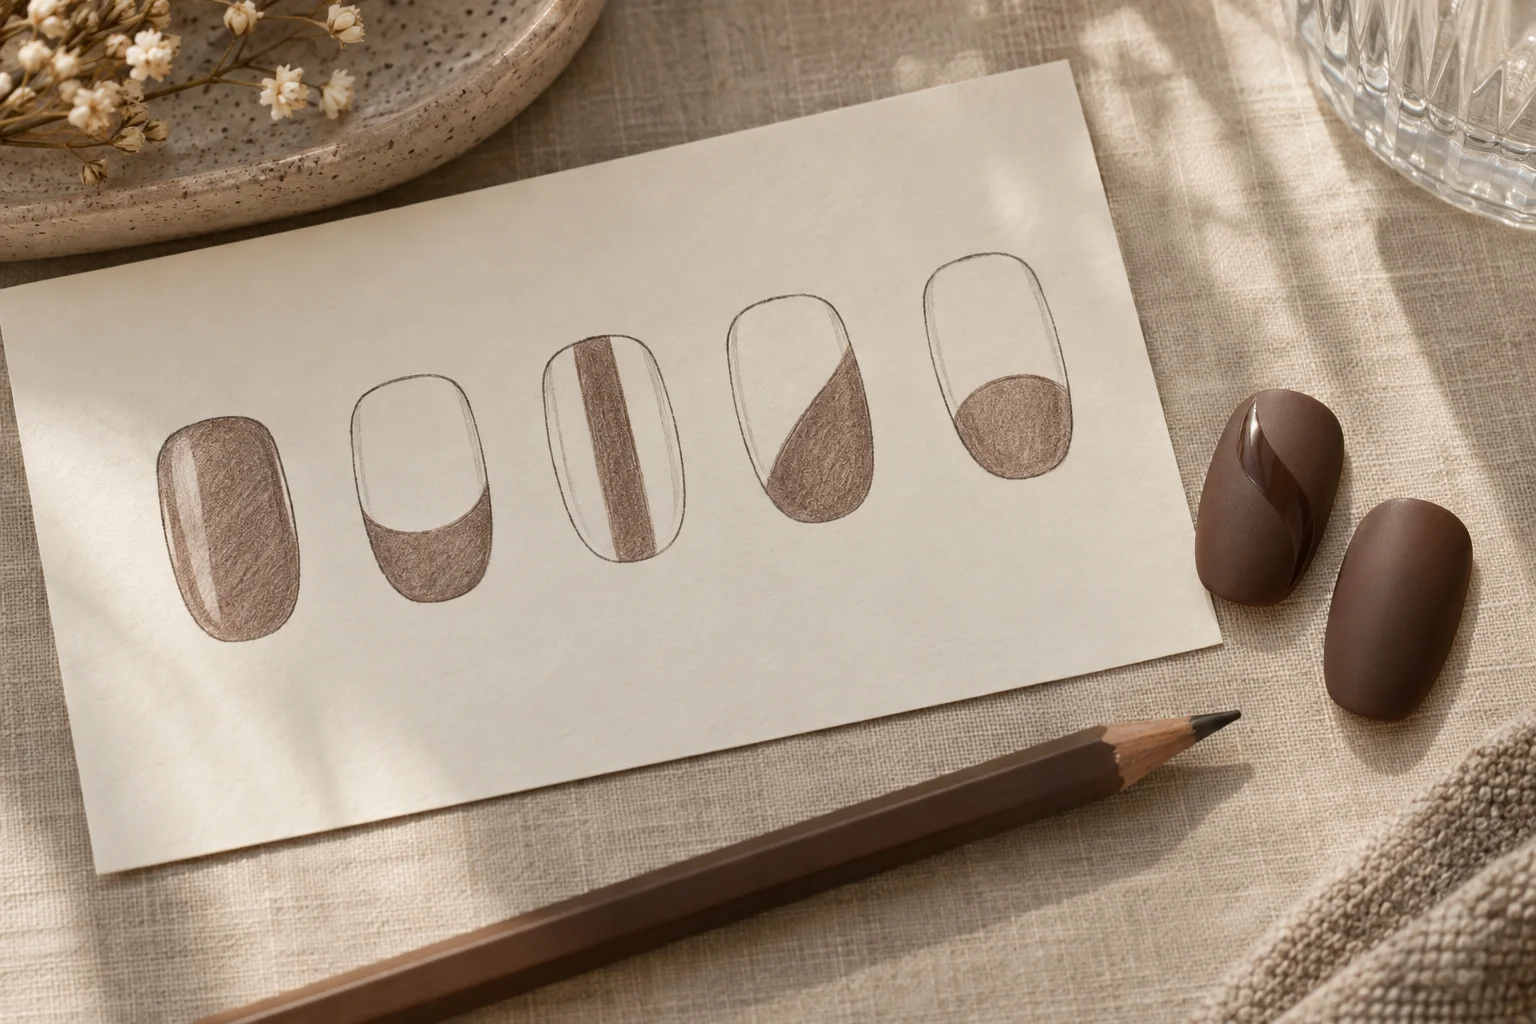
| Glossy curves | Matte chocolate brown with one off-center shiny curve | Add curves to every nail or only selected nails? |
For the least linework, choose whole-nail accents. Each nail receives one finish. Tips introduce a repeated boundary along the edge; curves let you place the detail away from that edge. This is a practical distinction in the design, not a tested difficulty ranking.
You can reverse any of these ideas. Try mostly glossy burgundy with one matte accent, for example. Decide which finish should dominate and which should supply the smaller detail.
2. Adapt the pattern to your nail length
Use your own nail outline as the starting point rather than copying every proportion from an inspiration photo. Sketch five nail shapes on paper and shade the areas you want glossy. A rough drawing is enough to make placement clear.
For short nails, try a narrow tip or one curve in the sketch first. If the glossy area takes over nearly the entire nail, reduce its width to preserve some matte space. On longer nails, consider spacing a curve farther from the edge rather than automatically adding more lines.
No particular shape is required for these design ideas. A tip can follow a rounded edge or echo a square outline. A curve might sweep from one side toward the tip or sit closer to the center. Choose its path deliberately so the artist does not have to guess from a light reflection in your reference photo.
Check the plan in one sentence: “Matte navy with a narrow glossy tip on every nail” is clear. If your description involves several overlapping finish changes, simplify the first version or make a separate sketch for each nail.
3. Use whole-nail placement for regular-polish DIY
For this limited DIY route, use the accent-nail layout. Gather one regular-polish color, the preparation products required by its instructions, and matte and glossy finishes documented as suitable for the intended use. Being nail coatings does not by itself establish that products are compatible.
- Set the finish map. For example: burgundy on every nail, glossy ring fingernails, matte everywhere else. Decide whether both hands will match.
- Follow the color system’s directions. Use its preparation, application, and drying instructions rather than an improvised universal routine.
- Check when each finish should be applied. In its FAQ, Essie instructs users of matte about you to let two coats of color dry fully before applying that matte finish. This is a product-specific instruction, not a drying schedule for all matte top coats.
- Apply the finishes to their assigned nails. Use matte on the planned matte nails and gloss on the accent nails, following each product’s directions.
- Complete the instructed drying process. Check before adding a drying aid; do not assume it is compatible with the finish.
Keep tips and curves as a separate practice project or salon request. OPI’s design examples establish the visual possibilities, but the selected sources do not provide a complete regular-polish linework method that applies across brands.
Also resist the habit of coating the entire finished design in gloss. Since gloss creates the shiny areas, extending it over the matte sections would work against the planned contrast. Establish the appropriate finishing sequence from the product instructions before starting.
4. Keep gel technique separate from polish drying
You can take the same finish map to a salon for a gel manicure, but not the same application sequence. OPI’s GelColor instructions specify named base and gloss products, thin applications, a particular lamp, curing between layers, and residue removal. That process is not interchangeable with waiting for regular polish to dry.
The cited guide covers a glossy GelColor application, not a complete matte-and-gloss gel design. It cannot establish the matte product’s layering requirements, curing time, or cleanup method.
Show the artist your intended finish placement and tell them what is already on your nails, if known. Ask which compatible system they would use. Do not transfer the regular-polish sequence above to gel, acrylic, dip, or press-on surfaces without applicable product guidance.
If you are also deciding between color alone and added structure, see what to clarify about gel polish and gel overlays before booking. That service choice is separate from deciding where the shine goes.
5. Turn your inspiration into a salon reference
Bring one main image for the look and a simple finish map for the placement. Tell the artist what you like about the image rather than expecting every visible detail to translate to your nails.
- Color: Should both finishes use the same shade?
- Placement: Which nails or areas should be glossy, and which should stay matte?
- Width: Do you want fine tips, broad bands, or substantial curves?
- Repetition: Should the hands match?
- Length and shape: Should the design fit your current nails, or are you considering a change?
Here is an example request you can adapt:
“I’d like one burgundy color, mostly matte, with narrow glossy tips on every nail. Please adapt the tips to my current length. Can you show me a sample of the finish contrast before we start?”
If the artist suggests changing the design, identify the part that matters most to you: the single color, the narrow shiny edge, or the curved placement. That gives you a useful basis for discussing alternatives.
Before booking, confirm that the salon offers the finish work you want and ask about its appointment scope and price. A directory category does not establish that a business offers this particular design.
6. Allow for changes in the matte finish
Matte areas can become shinier during wear. Essie’s FAQ attributes a loss of matte appearance to skin oils transferring onto the nail. This is the manufacturer’s explanation, not an independently measured wear result. The supplied evidence does not establish how many days the contrast will remain unchanged.
Keep that limitation in mind when choosing a finish-only pattern: its appearance may soften as the matte areas gain shine. Neither fine linework nor whole-nail accents come with a supported promise of lasting contrast.
Follow aftercare instructions for the products actually used. Ask the artist how to care for or refresh the finish, rather than applying another brand’s cleaning advice or adding a new coating without checking compatibility.
A successful design plan starts with a clear choice: where should the shine go? Use a whole accent nail for a regular-polish approach without linework, or prepare a precise tip or curve reference for a salon consultation. For other looks to adapt, explore Nail Art & Design Ideas.